I know I haven’t been blogging very much over here lately. I’ve been working on a new blog project and that’s where most of my focus has been. I’ll be blogging over there more often, so if you want to go check it out, head over to jennerosity.org. Don’t forget to add it to your .rss reader or bookmark it so you can keep up with all my Geeknesses.
Complete MAME cabinet
April 20, 2009 at 9:53 pm (Arcade Cabinet, Hobbies, Projects)

Ta-da!
While I was away in New York, my husband had to keep himself busy somehow. So, he did exactly what I would have done and put together an overly ambitious list of project and things to do 😀 Upon hearing all of his plans, I really hoped that he would just focus on the little finishing touches with the arcade cabinet and I am quite happy to say that this is exactly what he did (well, there were a few other things that he did, because he’s awesome, but this was the main one.)
Among the finishing touches, you can see that there is now a marquee across the top. Our good friend “the Nighthawk” came over to help him out with the wiring for it, so that it lights up. There’s a little switch so we can turn the lights on and off.
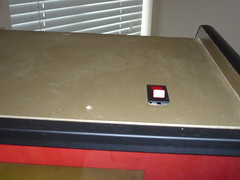
He has plans to redo the marquee as one solid sheet of paper from a printing company down the road. For now, it’s several overlapping images that shows when the light shines behind it, but it still looks cool!
He also had the chance to spray paint the logo on the sides.
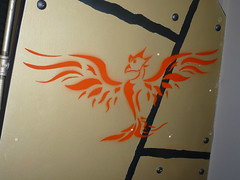
He set up a spray booth and cut out the stencil by hand. It was a lot of work, but totally worth it! Have I mentioned yet that L designed all the graphics himself? I think it looks really cool!
Of course, now he has plans for more touches being sprayed on, upgrades, and future cabinets. I can never be certain if he’s serious or not, but so far he’s mentioned a series of networked racing games (the ones where you sit right in them and play a car race game) and skee ball (especially after our recent trip to Castle Fun Park).
My Own Domain
February 14, 2009 at 3:03 pm (Uncategorized)
Today is turning out to be a GREAT DAY! I just won my own domain. So, now if I can work out some hosting deal with the current web host L and I use, I can actually play with WordPress.org! So, if things start changing around here, that’ll be the reason why, just fyi.
Skipping Rope Tape
February 14, 2009 at 1:41 pm (Exercise, Fitness)
Tags: skipping
Just an update, that I tried out using medical tape for the skipping rope and it was terrible. It tore through the tape after 2 rounds of skipping. Going to have to try another option. Does anyone know where to buy that special tape they use on books?
How to Tape a Skipping Rope
February 11, 2009 at 8:55 am (Exercise, Fitness)
Tags: howto, skipping, skippingrope
When I decided that I was going to do a skipping challenge, I found that there wasn’t much online with how-to articles for working with a speed rope. Most of what I know, I learned from taking boxing and kick boxing classes, and asking questions. So I figured I’d share what I learn as I go.
First, start with a rope. I like to use an inexpensive plastic speed rope that you can get at most sporting goods stores. Mine is bright green.

The fact that they are inexpensive is a pro. But, they also have their cons . . . they are all one-size and they can wear out and break. If you need to shorten the rope* and want to help increase the longevity of your rope applying a bit of tape can help adjust the length and decrease the wear and tear.
The ‘Before’ Handles

 See how lumpy the tops are? The one on the left is also kind of crooked too. The bulkiness is ok, but makes the turning motion a bit more awkward. You can’t see it in the picture either, but the taped parts further down the rope have been worn down and become very sticky and gummy from the friction, which also slows down the turning.
Tools:


-electrical tape**
-box cutter/sharp knife/scissors you’ll need to cut the electrical tape
-goo gone/nail polish remover/cleaner to remove any gunk you might have on the rope
I taped my rope when I first bought it, but I had done a sloppy job and it was time for it to be redone. So, I redid the tape job and took pictures as I went.
Preparations:
First, if your rope is already taped, like mine was, you need to remove the tape.

I used the box cutter to carefully cut off the old layer of electrical tape. You can see how much of it there was covering the end of the handle. The little black knob at the top was all that originally held the rope in place in the handle.
Second, you’ll want to make sure your rope is clean, so it’s easier to work with. I used some goo gone, but nail polish remover, or anything that’ll take the sticky off, would be good enough.
Third, you need to decide where to tape the rope. If you are adjusting the length, you’ll need to measure the rope for your height. The way to figure this out is by standing with your feet together on the rope and holding handles straight up. If the handles come up to your armpits, you will probably find it a good length for you. I originally used a sharpie marker to show where the handle will end on the rope, but you can also just eyeball it.
Taping to Adjust the Length:
Once you’ve figured out the length, you need to add some tape to adjust where the rope stops in the handles. Here are some tips to make the process a bit easier . . .

-start with a short piece of tape, it will be easier to keep neat.
-slowly build up layers
-build it up until it’s the same size as the original knob
-if you have to shorten it quite a lot, you might want to clip the end of the rope so it doesn’t interfere with the rope turning
Taping to Prevent Wear
The second place you’ll want to tape the rope, is at the spot where the rope comes out the bottom of the handle. If you leave it without any tape, the plastic handle tends to wear the plastic rope and weaken it, leaving it prone to snapping off at this point. Trust me when I say this is not a fun thing to have happen while you’re skipping! Here are some tips for this part . . .

-start the wrapping with a small piece of tape
-slowly add length
-be careful not to make it too thick!
I still need to work on perfecting this. The picture above is my before picture, and the tape is a bit thick. You can see that the tape is quite worn around the bottom.**

That’s it. It’s a fairly simple process, but I thought some explanation might help. I’ll finish off with a bunch of more pictures of my rope taping job . . . Enjoy! If you have any ideas about improvements or questions, feel free to fire away in the comments!


*You can also shorten the rope by tying a knot in the end, but for the small adjustment that I need to make, knotting it is more difficult. Also, depending on the plastic of the rope, the knot sometimes catches in the end of the handle making the turning awkward and choppy.
**I’m going to be experimenting with different kinds of tape that don’t get as gummy with the friction of the turning rope. More updates as I do more research.
Fitness Projects
February 5, 2009 at 4:07 pm (Exercise, Fitness, Goals)
Tags: skipping
In addition to my Boxing Cardio Challenge, I’ve also started working on another fitness challenge, this one with friends. We’ve teamed up with two other couples to work on our own ‘biggest loser’ type challenge, using a Wii Fit to measure our progress. L and I are the only ones without a Wii, so this is also a nice excuse to get together with our friends and play some Wii a couple times a month. We are trying to meet two Sundays each month to do active things. And, we’ve each set our goals on the Wii Fit too (and our friends even made little Mii versions of us all – so cute!). According to the Wii Fit I need to lose 8 pounds. That doesn’t sound like a lot, but the last few pounds are always a bit difficult.
We’ve had our initial weigh in, but haven’t had a chance to meet up for any Sunday activities yet. Some of the stuff we are thinking about doing . . . snowshoeing, a core yoga class, indoor rock climbing, and it’s even been suggested that we sign up for the Dragon boat festival (though we’ll need more than 6 people for that).
My boxing cardio challenge is going fairly well. I just added my 4th round of skipping into my routine. I’d like to be doing it a little more frequently than I currently am, but still struggle to get up early enough. I’ve also started adding in some strength training and yoga to my exercise during the week.
I finally managed to re-tape my skipping rope and am planning to post a tutorial about it. I don’t think there are nearly enough skipping related blog posts available on the web, so I’m taking it upon myself to fix that. I like the new tape job I did except the electrical tape does get gummed up with the friction of the turning rope. I’m considering a few different options to try out. By my third round I could feel the drag the sticky tape was putting on the rope turns, so if I’m going to work up to 12, I’d like to get the rope moving as smoothly as possible.
Progress Reports
January 31, 2009 at 11:06 pm (Exercise, Fitness, Progress Report)
Tags: driving, Exercise, jump rope, skipping
Last year I did occasional posts reporting on my progress. But, they turned out to be spotty at best. So, this year, I decided I’d do what seems to be all the rage in the blogging world, put progress reports in my sidebar. So, if you look to the side you should be able to spot my Big Rocks Progress Report. If you are reading in a feed reader, you won’t be able to see it, so you’ll have to click through to my actual page. I’ll try to do brief posts once in a while letting you know what’s been updated.
Lately, I’ve managed to do 2 perfect skipping rounds. Not in the same workout mind you. I’ve also decided that I’m going to have to re-tape my skipping rope as the current tape is starting to wear and affect the movement of the rope. I’m hoping to snap some pictures of the process and post a tutorial. One of the things I noticed when planning this challenge was the lack of information for skipping techniques and tips. This is really a shame since it’s quite a good conditioning workout and a lot of fun too. I’ll do my best to fill this void.
The only other update is that I actually drove. I can’t believe I went almost an entire month in 2009 without driving, but there you have it. Today I drove to and from work and my in-laws place. I’ll also be driving again tomorrow and will try to update the progress bar accordingly.
NYC – visual goal sheet
January 22, 2009 at 9:30 am (Goals, Inspiration, Life List, Motivation, Projects)
Tags: New York, travel
I decided that this year I would set up some visual reminders of my major goals. Something portable that I could take with me so that I can pull it out if I want a moment to focus or to remind myself of what’s important. The trip to New York is coming up really fast so I figured I’d better get cracking.

Each one is pretty small. It folds up into a small(ish) square that I should be able to put in my wallet. (That way, when I open it to grab my visa for something, I might think twice and realize what’s REALLY important to me this year.) Once I’m done, the visual goal sheets will also be a nice reminder of what I’ve accomplished in 2009.
I’m always at a bit of a loss when it comes to collage images since we aren’t in the habit of buying magazines at all. The above images were from two magazines that were purchased a year apart. Aside from work magazines we don’t get much else. I’m wondering how I might find some more images for free (or very cheap). Any ideas are welcome in the comments!
How do you keep focused on your goals? Do you use visual inspiration/motivation for achieving the things you want?
Project in Waiting = Home Decor
January 14, 2009 at 9:30 am (Projects)

Last summer, when we were still doing the lion’s share of the arcade cabinet work, my husband found a diamond in the rough. The estate auction by his workplace had the radio you see above arrive. He’d already thought that it would be fun to do a project with an old style radio. He wanted to put in a sound system/juke box configuration, etc. (I listen, I don’t memorize the details). His main hesitation was that an antique radio can be expensive, and all he really wanted was the shell. So, when he saw this radio shell, he couldn’t resist and we picked it up for very cheap.
It sat in our front hall for weeks. Then moved to the garage for a while. Then we decided to wipe it down and put it in its eventual spot. It still looks pretty good even if it has a bunch of nicks and scratches (which you can’t see in the picture, but they are there). I think this one might be a project for next summer, when it’s warm enough for outdoor work again.
As a side update on the arcade cabinet, I haven’t neglected to upload finished project pictures yet. It isn’t actually officially finished. Still haven’t done side artwork or the lit marquee across the top. It’s playable and tones of fun, but L doesn’t want to post ‘finished’ pictures until he gets around to these little details.
Big Rock Goal #5 – Driver’s License Update
January 12, 2009 at 4:37 pm (Goals)
Tags: driving
Ok, I went online to book the road test and realized a slight glitch in my plan. They only allow you to book your test a maximum of 100 days in advance. I guess it’s to prevent everyone from booking in the summertime just to avoid the rainy and snowy months.
So, I’ve updated my plan and set up a recurring reminder notice to myself to book the road test. I’ll keep checking for appointments and book one for the summertime (I may not necessarily wait until August anymore) as soon as I can.
